They can turn any yard into a creative playroom by defining clear zones—sandbox, water‑play, art nook, and nature garden—using cheap, easy‑to‑assemble materials like reclaimed wood, rubber mulch, and PVC brackets. Natural borders such as shrubs or a low canopy keep sightlines open for supervision while flexible structures like a bean‑pole tent let the space grow with kids’ interests. Soft‑surfaces, anchored equipment, and modular accessories ensure safety and fun, and a phased budget keeps costs under $300. The next sections reveal step‑by‑step details.
Define Your Backyard Playroom Goals and Layout
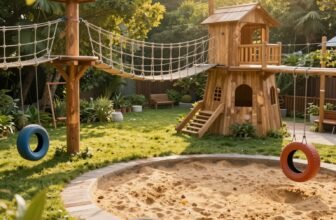
Ever wondered how a simple backyard can become a kid’s personal “outdoor room”? She starts by pinning down clear goals: privacy for focused play, zones for different activities, and flexibility for the seasons. She sketches a layout that marks a “room” with natural borders—shrubs, a trellis, or a low‑cost fabric canopy—so the space feels enclosed without permanent walls. She allocates a sandbox corner, a water‑play strip, and a creative art nook, each spaced to avoid crowding and to keep sightlines open for supervision. She places a flexible structure, like a bean‑pole tent, where it can be moved as interests shift. She also notes traffic flow, ensuring pathways avoid tripping hazards and that each zone has a clear entry. By defining these objectives and mapping them onto the yard’s shape, she creates a functional, inviting outdoor room that encourages independent, imaginative play.
Estimate Your Backyard Playroom Budget
After sketching the layout and setting clear objectives, she now calculates the cost of turning that vision into reality. She breaks the budget into three buckets: hardscape, softscape, and accessories. Hardscape covers permanent items like a swing set, slide, or modular playhouse, usually ranging from $300 to $1,200 depending on material and size. Softscape includes safety surfacing—rubber mulch, interlocking foam tiles, or engineered wood fiber—costing $140 to $320 for 25–40 cu ft. Accessories encompass portable stations such as a sandbox, chalkboard wall, or DIY mud kitchen, which can be built for under $150 using reclaimed pallets, PVC pipe, and basic hardware. She adds a 10 % contingency for unexpected expenses and allocates a modest $50 for tools and fasteners. By tallying each category, she arrives at a realistic total that balances creativity with affordability, ensuring the backyard playroom stays within her financial comfort zone.
Add a Sensory Water Station to Your Backyard Playroom
How can a simple water feature turn a backyard into a sensory playground? A sensory water station invites children to explore splash, temperature, and flow, sharpening tactile and auditory senses while they experiment with cause‑and‑effect.
Parents can set up a sturdy, shallow basin or a DIY water table using a reclaimed pallet, PVC pipe, and a low‑flow pump. Adding floating toys, spray nozzles, and a small hose lets kids control water streams, fostering fine‑motor coordination and problem‑solving.

Safety‑approved materials—non‑slip mats, rounded edges, and a gentle slope—reduce injury risk. Position the station near shade and a drainage area to keep the space tidy.
Intermix sand or pebbles for mixed‑media play, encouraging curiosity about texture and volume. With minimal cost and easy maintenance, a water station transforms any outdoor room into a dynamic, multi‑sensory hub that supports active, creative learning.
Set Up a Portable Art Zone for Your Backyard Playroom
Where can you find a mess‑friendly creative nook that rolls away when playtime ends?
Parents can set up a portable art zone using a lightweight, weather‑proof easel and a fold‑up table that lock onto a sturdy base. A rolling cart holds buckets of washable paint, brushes, and chalk, while a waterproof tarp beneath catches spills. Clip‑on storage bins tuck under the table, keeping supplies organized but within reach. When the sun sets, the cart wheels to a corner, and the tarp folds into a compact bundle for easy storage in a shed. The zone stays flexible: swap the easel for a chalkboard panel or add a small easel for sculpting with clay. By using UV‑coated fabric covers, the equipment resists rain and sun, ensuring durability. This setup encourages spontaneous drawing, color mixing, and collaborative murals, all while keeping cleanup swift and the backyard tidy.
Build a Nature-Based Learning Garden for Your Backyard Playroom
Ever wonder how a simple garden can become a living classroom? Parents can carve a nature‑based learning garden right into the backyard playroom, turning soil into a hands‑on syllabus. They start by mapping a bounded “garden zone” with low hedges or a wooden trellis, giving kids a defined space without walls. Child‑size tools—trowels, watering cans, and seed trays—let them plant herbs, beans, and wildflowers, fostering responsibility and patience. Adding a bird feeder, a shallow butterfly pond, and a few stone logs invites wildlife observation, turning every visit into a mini‑science lesson. Magnifying glasses, insect nets, and a simple weather station spark curiosity about ecosystems and weather patterns. Seasonal planting cycles keep the garden dynamic, offering fresh topics from germination to pollination. By integrating easy‑care plants and interactive elements, the garden nurtures creativity, empathy, and active learning—all while staying safe, low‑maintenance, and budget‑friendly.

Install Swings, Slides, and Balance Beams in Your Backyard Playroom
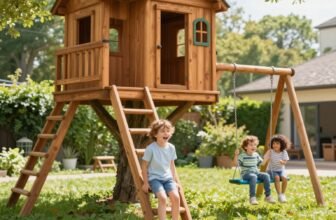
Why settle for a flat lawn when a few well‑placed swings, slides, and balance beams can turn a backyard into an active‑play arena? Installing a swing set adds rhythmic motion that hones core strength and spatial awareness. A sturdy slide offers a quick, exhilarating descent that encourages kids to climb, balance, and control speed. Balance beams, whether low‑profile wood or flexible rubber, sharpen proprioception and gait stability while inviting imaginative games like “tightrope walking.” Proper placement matters: keep at least six feet of clearance around swings, use rubber mulch or interlocking tiles for safe landings, and anchor beams to the ground to prevent wobble. Pair these elements with natural borders—shrubs or trellises—to create a defined play zone without permanent walls. By mixing vertical motion, smooth glides, and linear challenges, families transform an ordinary yard into a dynamic, health‑boosting playground that fuels both energy release and skill development.
Build a DIY Obstacle Course for Your Backyard Playroom
Adding a swing set, slide, and balance beam already creates vertical and linear challenges, but weaving them together with a DIY obstacle course turns the yard into a cohesive adventure zone. Parents can map a circuit that loops around existing equipment, using sturdy cones, low‑profile hurdles, and flexible rope ladders. A simple tunnel made from a repurposed PVC pipe invites crawling, while a series of stepping stones—cut from reclaimed hardwood—sharpens balance. To keep momentum high, place a few “speed zones” of rubber mulch where kids can sprint safely. Incorporating a climbing wall fashioned from a plywood sheet and rope grips adds a strength element without overwhelming space. The course should follow a clear path, with each station spaced to allow recovery and imagination. By arranging these pieces in a fluid sequence, the backyard becomes a dynamic playground where kids practice coordination, problem‑solving, and confidence while staying active.
Choose Budget-Friendly Materials and Plan Phased Upgrades for Your Backyard Playroom
By combining reclaimed wood, recycled rubber mulch, and budget‑friendly PVC fittings, families can create a functional playroom without breaking the bank, then upgrade it step‑by‑step as needs and funds grow.
First, they lay a simple base of compacted gravel topped with a thin rubber‑mulch layer for safety and drainage.
Next, they assemble a low‑profile frame from salvaged lumber, attaching PVC pipe brackets for modular shelving and a bench that doubles as storage.
As the budget allows, they replace the mulch with interlocking foam tiles, add a weather‑resistant canopy, and install a small sandbox using a repurposed pallet box.
Each phase uses readily available, cost‑effective materials, keeping total spend under $300 while expanding play options.
Frequently Asked Questions
How Often Should I Rotate Play Zones for Sustained Interest?
They recommend rotating play zones every two to three weeks, keeping kids engaged while allowing seasonal tweaks. Frequent changes prevent boredom, spark fresh curiosity, and let families adjust layouts without major renovations.
Can I Integrate Solar Lighting Without Affecting Safety Standards?
She can install solar lighting safely by using low‑voltage LED strips, mounting fixtures away from play zones, sealing connections against moisture, and ensuring all components meet UL or CE safety certifications.
What Are the Best Low‑Maintenance Plants for a Kids’ Garden?
She recommends marigolds, lavender, zucchini, and strawberries—plants that thrive in sun, need minimal watering, and tolerate occasional foot traffic, offering bright colors, scent, and tasty harvests for kids.
How Do I Ensure Water Features Stay Child‑Proof During Winter?
They’ll winter‑proof water features by draining and drying them, insulating exposed pipes with foam, covering surfaces with removable tarps, securing lids tightly, and storing removable components in a dry shed.
Are There Any Noise‑Reduction Tips for Backyard Swings?
They recommend adding rubber mulch or foam pads under the swing set, installing a weather‑proof canopy to muffle wind noise, and using low‑profile, padded chains; these steps cut echo and soften impact sounds.
Conclusion
By setting clear goals, budgeting wisely, and mixing sensory, artistic, and nature‑based elements, families can transform any backyard into a vibrant playroom that sparks kids’ imagination and keeps them moving. Thoughtful placement of swings, slides, balance beams, and DIY obstacle courses adds excitement, while portable art zones and water stations invite endless exploration. With budget‑friendly materials and phased upgrades, the space grows with the child, delivering lasting fun and creative learning right at home.